-40%
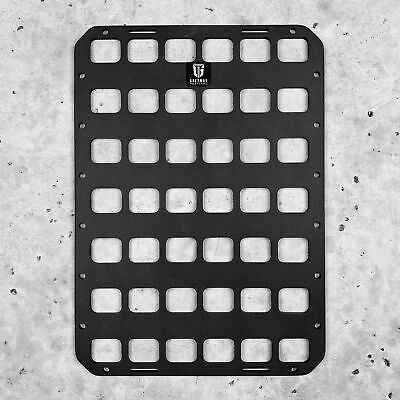
Rigid MOLLE Panel - 10 X 14 RMP
$ 31.67
- Description
- Size Guide
Description
RMP Tactical Backpack Insert- Rigid Panel stays upright in backpack
- Attach MOLLE style pouches to organize your gear
- Customize with Adhesive Backed Loop to accept Velcro Hook Pouches
- Use GMT backer plates to hard mount a variety of accessories
- Universal fit, check compatibility chart for sizing
- 0.25" holes on edge for mounting with screws
- 1" slots for attaching handles or mounting with 1" webbing
The RMP was designed for modular organization on a rigid platform that allows vertical organization within a backpack. Quick access to your gear is enhanced by the consistent positioning and customizable layout. When inserted into any bag, it gives you the tactical ability to organize your mission critical gear on an interchangeable platform that can be swapped out or quickly reorganized as the mission changes.
Product Specifications
Width: 10" (254mm)
Height: 14" (355.60mm)
Thickness: 0.188" (4.77mm)
Material: High Strength Polyethylene
Weight: 8 ounces (226.80 grams)
Backpack Compatibility
The 10in x 14in RMP Backpack Insert fits:
- Haley Strategic Flatpack Plus
- Any bag with interior dimensions equal to or greater than 10in wide x 14in tall
Securing RMP inside Backpack
For Backpacks with Internal Webbing:
Some backpacks have MOLLE webbing sewn inside. You can loop a velcro one wrap, Velcro Cinch Strap, Web Dominator, or Grimloc through the internal MOLLE webbing of the backpack and secure the panel to the pack using one of those methods.
For backpacks with Internal Velcro Loop:
- Purchase "Low Profile Hook - Adhesive Backed - 3/4" Width" from GMT.
- Ensure the panel is cleaned with an alcohol wipe and completely dry.
- Peel the backing off the adhesive backed velcro tape and place the hook section onto the panel. Press firmly into place, and then press further with a rolling pin or place heavy weight onto panel to compress and ensure full contact.
- Apply heat from a hair dryer to warm up the panel and the velcro hook tape, enabling the adhesive to "run" or liquefy enough to seep into the panel for a better bond.
- Optionally, use 3M Primer 94 to prime the surface before sticking the adhesive backed velcro into place. This promotes higher adhesion to the panel.
For any backpack without internal MOLLE webbing:
Hydration Bladder Loop
- Secure the panel at the top of the internal main pocket by using a hydration bladder loop if available. Use Velcro one wrap or Grimloc.
Grommet / Chicago
- Punch a hole in the fabric and secure a grommet to prevent ripping. Use a chicago screw to secure the panel to the grommet.
Adhesive backed Velcro
To adhere the Adhesive backed Velcro Hook tape to your RMP panel:
- Ensure the panel is cleaned with an alcohol wipe and completely dry.
- Peel the backing off the adhesive backed velcro tape and place the hook section onto the panel. Press firmly into place, and then press further with a rolling pin or place heavy weight onto panel to compress and ensure full contact.
- Apply heat from a hair dryer to warm up the panel and the velcro hook tape, enabling the adhesive to "run" or liquefy enough to seep into the panel for a better bond.
- Optionally, use 3M Primer 94 to prime the surface before sticking the adhesive backed velcro into place. This promotes higher adhesion to the panel.
To adhere the Loop side adhesive backed velcro to the backpack:
- Once Velcro Hook is adhered to the panel, stick the velcro loop onto that strip on the panel as well so it is perfectly lined up
- Flip your backpack inside out so you get an unobstructed view of the interior back panel of the bag that the rigid molle panel will fit against
- Peel the plastic off the adhesive backed velcro loop (leaving the velcro loop stuck in place on the RMP)
- Line up the entire RMP where you want it in the backpack and stick it down in place. Press firmly to ensure Velcro Loop side has stuck to bag, and then peel the panel/velcro hook away from the bag, careful to leave the velcro loop in place inside the bag.
- Press further with a rolling pin or place heavy weight onto panel to compress and ensure full contact. Apply heat from a hair dryer to warm up the bag and the velcro loop tape, enabling the adhesive to "run" or liquefy enough to seep into the bag fabric for a better bond.
Attaching Holsters with Quick Detach Platforms
Set Backer Plate into punch out from back of RMP panel at desired location.
- Accessories with multiple backer plates may need the backer plates to be oriented properly for either vertical or horizontal mounting
- Pass screws through Female Receiver Plate and into tapped hole of backer plate from the front side of the RMP panel, screw in to secure.
- Screw the Male Plate onto the Holster.
- If desired mount additional Female Receiver Plates onto a belt loop, MOLLE webbing of bag or vest elsewhere, separate RMP panel in a vehicle, storage case, safe door etc. Anywhere you mount additional Female Receiver Plates will allow you to quickly secure the piece of gear that has the Male Plate to that item. The same procedure can be used to attach any accessory that requires backer plates
Attaching MOLLE Pouches
Upgrading to accept Velcro Hook/Loop Pouches
To upgrade any RMP to accept Hook backed pouches, morale patches, or accessories follow the below steps:
To adhere the Adhesive backed Velcro Loop tape to your RMP panel:
- Purchase "Low Profile Loop - Adhesive Backed - 1" Width" from GMT.
- Ensure the panel is cleaned with an alcohol wipe and completely dry.
- Peel the backing off the adhesive backed velcro tape and place the loop section onto the panel. Press firmly into place, and then press further with a rolling pin or place heavy weight onto panel to compress and ensure full contact.
- Apply heat from a hair dryer to warm up the panel and the velcro, enabling the adhesive to "run" or liquefy enough to seep into the panel for a better bond.
- Optionally, use 3M Primer 94 to prime the surface before sticking the adhesive backed velcro into place. This promotes higher adhesion to the panel.
